Cart
0
TL;DR:
- Following a step-by-step process transforms cluttered bookshelves into curated displays by emphasizing intentional placement and balance. Removing unnecessary items, applying the rule of thirds, and incorporating height variation create visual harmony and highlight focal objects. Regular editing and personal touches ensure shelves remain stylish, organized, and reflective of individual personality over time.
A bookshelf that looks cluttered, random, or simply boring is one of the most common styling frustrations homeowners face. You have the books, the bits and pieces, maybe a few ornaments you love, yet somehow it never quite comes together. Step by step bookshelf styling solves that problem by giving you a clear, repeatable process rather than vague advice about “making it look nice.” Follow this guide and your shelves will go from storage space to the kind of curated display that draws compliments and makes your whole room feel more considered.
Table of Contents
- Key takeaways
- Essential preparations before you start
- The step by step styling process
- Personalising your shelves without losing the look
- Editing and refining for a lasting result
- My honest take on bookshelf styling
- Complete your shelves with Homable
- FAQ
Key takeaways
| Point | Details |
|---|---|
| Start with an empty shelf | Clear and clean before styling so every decision is intentional rather than reactive. |
| Use the rule of thirds | Divide each shelf into books, decor objects, and breathing room for instant visual balance. |
| Group, don’t scatter | Place accessories in clusters of two or three rather than spacing them evenly across the shelf. |
| Negative space is not wasted | Leaving 20 to 30% of each shelf empty makes your hero pieces stand out rather than disappear. |
| Edit ruthlessly at the end | Remove 10 to 20% of items after stepping back to get a professional, uncluttered finish. |
Essential preparations before you start
The single biggest mistake people make with step by step shelf styling is trying to arrange items on a shelf that already has things on it. You cannot see what you are working with until everything is off and the surface is clean.
Start by removing every single item from your bookshelf. Dust the shelves while they are empty because styling on a dusty surface undoes all your hard work. Once everything is on the floor or a nearby table, sort your items into three groups.
- Keep: Books you love, objects with genuine meaning, decor pieces that fit your room’s colour palette.
- Relocate: Items that belong elsewhere in the home but drifted onto the shelf over time.
- Remove: Anything broken, dated, or that you simply do not like enough to display.
This editing step is where most of the real work happens. Be honest. A shelf filled with items you feel indifferent about will always look uninspired.
Once you have your keep pile, gather the additional materials that will make the styling process smoother.
| Item | Purpose |
|---|---|
| Books (varied heights) | Anchor pieces and horizontal stack platforms |
| Small plants or greenery | Organic texture and softness |
| Vases or candlesticks | Height variation |
| Picture frames (2 to 4) | Personalisation with cohesion |
| Small sculptures or ornaments | Focal point objects |
| Baskets or small boxes | Storage that also looks intentional |
Pro Tip: Group your kept items by colour before placing anything back. A rough colour palette check at this stage prevents the visual chaos that comes from mixing too many competing tones.
The step by step styling process
This is where your shelf comes to life. Work shelf by shelf rather than trying to style the whole unit at once. Each shelf is its own composition.
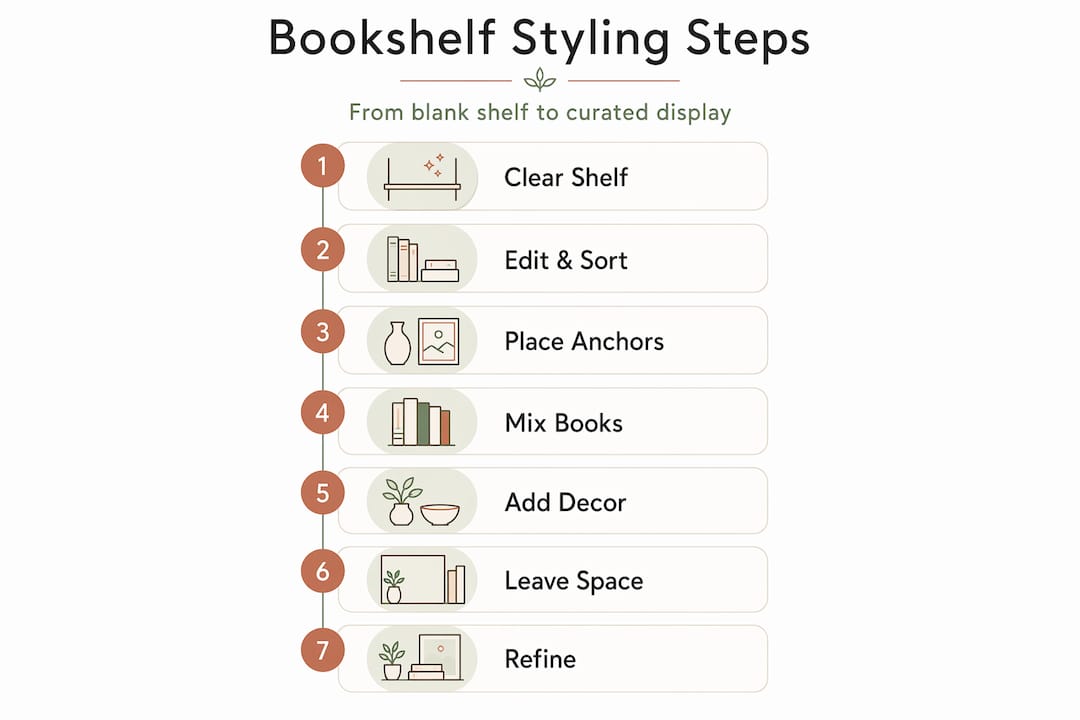
Step 1: Place your anchor items first
Start with large anchor items placed first on each shelf before adding smaller accents. An anchor is anything with significant height or visual weight. Think a tall stack of books, a substantial vase, or a statement ornament. These create the foundational balance that everything else builds around.

Step 2: Apply the rule of thirds
Divide each shelf into thirds: roughly one third books, one third decorative objects, and one third breathing room. This is the most reliable formula in shelf decorating because it naturally prevents both the cluttered look and the sparse, forgotten look.
Step 3: Mix your book orientations
Vertical and horizontal book stacks both have a role to play. Vertical books create familiar structure. Horizontal stacks act as platforms for smaller decor items, adding dimension and breaking visual monotony. Aim for a mix on each shelf rather than all books standing upright.
For the vertical books, arrange them by height to create a pleasing gradient rather than a jagged skyline. You can also group by colour if your books have attractive spines.
Step 4: Create grouped clusters, not even spacing
One of the most transformative bookshelf arrangement ideas is moving away from evenly spaced objects. Two accessory groupings per shelf section create natural focal points and guide the eye across the shelf in a way that single, evenly spaced items never do. Place a small vase, a candle, and a tiny ornament together rather than distributing them one by one.
Step 5: Vary your heights
Flat shelves look flat. Use taller objects like candlesticks or vases alongside shorter items to create visual rhythm. Place a small ornament on top of a horizontal book stack to raise it up without adding another tall object to the floor of the shelf.
Step 6: Add organic elements
A small trailing plant, a few stems in a narrow vase, or even a sprig of dried botanicals adds a softness that manufactured objects cannot replicate. Greenery stops shelves looking too rigid or showroom-like.
Step 7: Leave intentional negative space
At least 20 to 30% negative space per shelf is not wasted room. It is what separates a curated display from a crowded storage unit. You can even leave an entire shelf section completely empty to create a zone of rest for the eye.
Pro Tip: If you find yourself wanting to fill every gap, put the extra items in a box and live with the shelf for a week before deciding whether they are truly needed.
Personalising your shelves without losing the look
The best bookshelves tell you something about the person who lives there. The challenge is adding personality without undoing all the careful balance you have just created. This is where best bookshelf styling techniques and personal taste need to work together.
Choose two to four picture frames with a consistent finish, whether that is all black, all natural wood, or all brushed metal. Mixing frame styles across a small shelf makes it look assembled rather than curated. Consistency in the frame finish ties personal photos and artwork into the overall palette without effort.
Use odd numbers of decorative objects within your clusters. Three items grouped together look more natural than two or four. Five works well for a larger cluster on a wider shelf. This is one of those techniques that feels counterintuitive until you see it in action.
Here are a few practical ways to personalise while keeping balance:
- Lean frames against the shelf back for a relaxed, layered look rather than mounting everything rigidly upright.
- Display one meaningful travel souvenir or small sculpture per shelf section, not a collection of them.
- Balance personal items with at least one plant or neutral object nearby to prevent the shelf from feeling like a memory board.
- Keep sentimental items at eye level where they can be appreciated rather than buried on a lower shelf.
The goal is a shelf that feels lived-in and personal without looking like a charity shop display. You are curating, not collecting. For more guidance on grouping and object placement across your home, the Homable guide to home accessory styling covers these principles in detail.
Editing and refining for a lasting result
You have styled your shelves. Now step back. Literally walk to the other side of the room and look at each shelf from a distance. What draws your eye first? What looks crowded? What looks lonely?
Remove 10 to 20% of items after this review. This is non-negotiable if you want a professional finish. Items that looked fine close up often create noise when viewed from across the room. Trust the distance perspective over the close-up one.
Next, check your colour palette. Do the colours feel consistent across all shelves, or does one shelf look completely different from the others? Consistency does not mean everything must match, but there should be a thread connecting the shelves.
| Common mistake | How to fix it |
|---|---|
| Too many small objects scattered across the shelf | Consolidate into two or three grouped clusters |
| All books standing vertically at the same height | Introduce horizontal stacks and vary book heights |
| No negative space left | Remove items until roughly 20 to 30% of each shelf is empty |
| Frames with mismatched finishes | Swap out frames for a consistent finish across all shelves |
| No height variation | Add a tall vase, candlestick, or stacked books as a height anchor |
Maintaining styled shelves over time requires one simple habit. Every month or so, take five minutes to remove anything that has crept onto the shelf without intention. Books left after reading, random objects placed there temporarily. These small additions are how styled shelves become cluttered shelves again. Check out Homable’s storage styling guide for strategies on keeping shelves organised over the long term.
My honest take on bookshelf styling
I have styled a lot of bookshelves. My own, friends’ homes, and spaces I have helped put together over the years. And the single lesson that took me the longest to actually believe is this: negative space does more work than any object you could place on a shelf.
I kept filling gaps because empty space felt unfinished. What I eventually realised is that empty space is what makes everything else visible. The ornament you love gets lost when it is surrounded by ten other things. Give it room, and suddenly it earns its place.
The other thing I have seen people resist is horizontal book stacking. It feels wrong at first, like you are breaking the rules. But a shelf of nothing but upright books is just a wall of spines. A few horizontal stacks break the rhythm, create levels, and give you platforms that make even a simple candle or small ornament look considered.
My final honest observation: the shelves that look most effortlessly curated are almost always the ones that had the most removed from them. The first version is always too full. Step back, take things off, and you will find the shelf you were trying to create was there all along underneath the clutter.
— Cristiano
Complete your shelves with Homable

Once you have the framework right, the objects you choose matter more than you might think. A beautifully styled shelf built around mediocre accessories will always fall flat. Homable’s range of home decor and accessories is put together with exactly this in mind: pieces that have genuine visual presence without overwhelming a space.
The Stars on Wooden Base Ornament at 40cm makes a strong anchor piece for a central shelf section, providing the height and character that pulls a whole composition together. For something more intimate, the Star and House Scene Ornament at 18cm fits neatly into a grouped cluster alongside books and greenery. And for shelves that need a sculptural focal point, the Abstract Silver Couple Ornament brings artful personality without competing with surrounding pieces. Browse Homable’s full collection for quality decor at accessible prices, with free shipping on orders over £100.
FAQ
How do I start styling a bookshelf from scratch?
Clear everything off the shelf first, then sort your items into keep, relocate, and remove piles. Begin placing anchor objects first before adding smaller accents and books.
How much empty space should a bookshelf have?
Aim for 20 to 30% negative space per shelf. This prevents visual overwhelm and lets your focal pieces stand out rather than compete for attention.
How many decorative objects should I put on each shelf?
Work with two groupings of accessories per shelf section rather than spreading individual items evenly. Odd numbers within each group such as three or five objects create the most natural visual balance.
Should books be arranged vertically or horizontally?
Both. Mix vertical and horizontal orientations across each shelf. Horizontal stacks act as platforms for small decor items and break the monotony of a shelf full of upright spines.
Why does my styled shelf still look cluttered?
Step back and remove 10 to 20% of items after you have finished styling. What looks balanced up close often reads as busy from across the room, and editing by removal is the most reliable fix.