Cart
0

TL;DR:
- Designing a room around people and movement supports daily routines and improves functionality. Careful circulation mapping and zone planning ensure furniture placement follows the room’s natural flow. Using measuring and live testing with tape helps create a layout that looks good and works well in real life.
Design around people first, then movement, then furniture. That single principle separates a room that looks good in photos from one that actually works on a Tuesday morning. Designing a functional layout means mapping how you and your household move through a space before a single piece of furniture is placed. Techniques such as circulation mapping, bubble diagrams, and zone planning give that process structure. Once the plan is solid, finishing pieces from Homable — rugs, runners, storage, curtains — slot in to complete both the function and the look.
The order matters more than most people realise. Functional design is about making every area flow naturally so the space supports daily routines without conscious effort. When you skip straight to furniture, you tend to block the very paths you use most. Start with people and movement, then let furniture and accessories follow the logic of the room rather than fight it.
Table of Contents
- Before you move anything, run this checklist
- How to plan a functional layout from scratch
- Room-by-room tips for every space in your home
- Choosing storage, textiles, and finishes that preserve flow
- Common layout mistakes and how to fix them
- How long layout changes take and what they cost in the UK
- How Homable products complete your layout plan
- Key takeaways
- Why less furniture usually means a better layout
- Further reading and sources
- Homable: decor that fits your plan, not the other way around
Before you move anything, run this checklist
A few minutes of measuring now saves hours of rearranging later. Walk the empty room and note the following:
- Measure everything that constrains placement: door widths, window recess depths, ceiling height, and the width of your main circulation route through the room.
- Observe natural pathways at different times of day. Where do you instinctively walk? Mark those routes roughly on a sketch. Rushing to fill a space without observing these paths first is the most common homeowner mistake.
- Map door swings and window positions. Door swing radii and sunlight paths frequently determine where bulky items can and cannot go.
- Note radiator locations, socket and switch positions, and which direction natural light enters at different hours.
- Check interior door clearances carefully — replacing or repositioning a door that conflicts with your layout is a bigger job than most people budget for, but interior doors have a significant impact on how a room functions day to day.
Pro Tip: Photograph every door swing and window sightline on your phone before you start. These images are invaluable when you are browsing products online and need to verify whether a piece will actually fit.
How to plan a functional layout from scratch
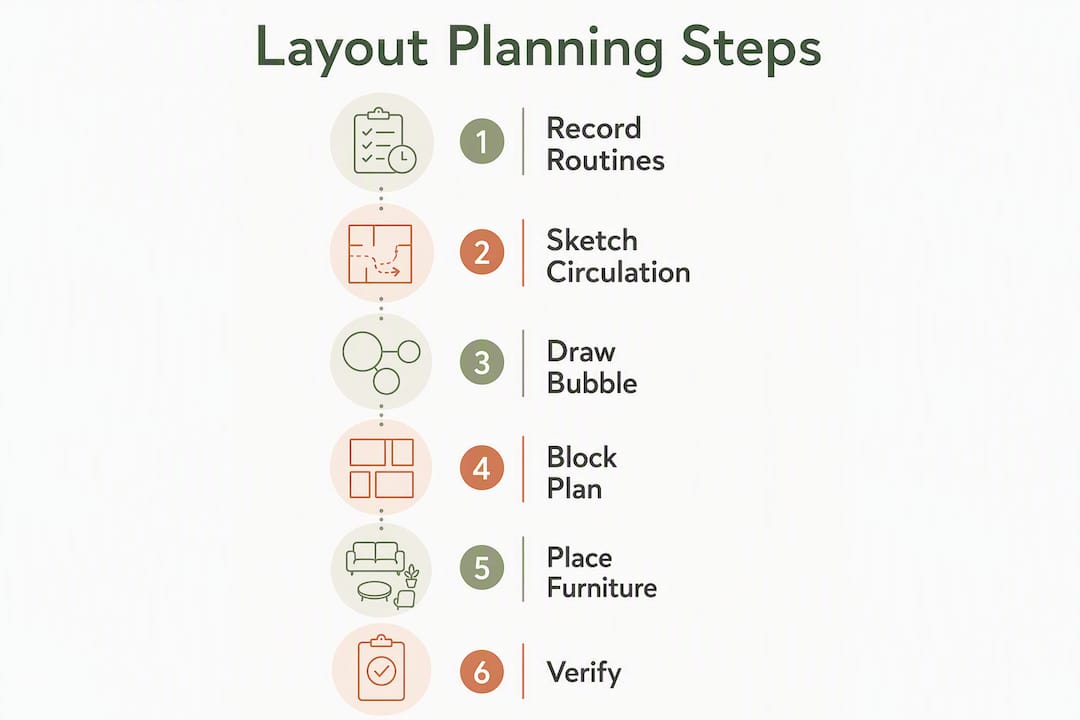
A staged method catches errors early and cheaply. The table below summarises the stages, drawn from the Studio Matrx workflow for functional house planning.
| Stage | What you do | Typical duration |
|---|---|---|
| 1. Brief | List who uses the room, when, and how | 1–2 hours |
| 2. Site analysis | Measure, photograph, note light and services | Half a day |
| 3. Bubble diagram | Sketch adjacencies and zone relationships | 1–2 hours |
| 4. Block plan | Convert bubbles to scaled room shapes on a grid | 2–4 hours |
| 5. Refined plan | Place furniture, check clearances and services | Half a day |
| 6. Verification | Daylight, ventilation and acoustic checks | ~20 minutes per check |
Step 1: Record routines. Who uses the room, at what time, and for what purpose? A home office used by one person differs from a living room shared by a family with young children.
Step 2: Walk and sketch circulation. Mark primary routes (the paths you use every day) and secondary ones. Circulation is the plan’s invisible skeleton — settle it before choosing any furniture.

Step 3: Draw a bubble diagram. Sketch loose circles representing zones and draw lines between the ones that need to be adjacent. A bubble diagram prevents bad adjacencies and stops service circulation from crossing social zones before any geometry is fixed.
Step 4: Convert to a block plan. Align your zones to the room’s structural grid. Check that door swings and window daylight paths remain unobstructed.
Step 5: Place furniture and test. Confirm socket and radiator positions, then physically test the layout using tape on the floor or cardboard cut-outs before buying anything.
Step 6: Verify. Early verification of daylight, ventilation and acoustic privacy reduces costly rework. Each check takes roughly 20 minutes done methodically.
Pro Tip: Tape the outline of a proposed sofa or bed on the floor and live with it for a day. You will spot clearance problems immediately — and avoid an expensive return.
Room-by-room tips for every space in your home
Living room
- Define a conversation zone and a circulation zone separately. Aim for clear walkways wide enough for comfortable movement between seating and walls or other furniture.
- Position the sofa so the TV sightline is comfortable without neck strain. A rug anchors the seating zone; the front legs of the sofa should sit on it, not float beside it.
- Assign distinct zones — a reading nook versus a social hub — to keep multi-use rooms flexible as your needs change.
- Natural light should drive seating placement. Sitting areas benefit from morning light, while screens need glare-free positions.
Kitchen
- Plan around the work triangle: sink, hob, and fridge should form a compact, unobstructed triangle. Check appliance door clearances before placing any mat or runner.
- A washable kitchen runner positioned between the sink and hob supports flow and protects the floor. Homable’s washable kitchen rug (45×150 cm, non-slip velvet) fits this use case precisely.
Bedroom
- Separate the sleeping zone from the dressing zone. Leave enough space beside the bed for bedside access and ensure wardrobe doors can open fully without hitting the bed frame.
- Plan lighting in layers: ambient for the room, task lighting beside the bed, and a dimmer if possible. Refer to Homable’s bedroom styling checklist for a room-specific guide.
Bathroom
- Measure the door swing against sanitaryware positions before buying any mat. A non-slip bath mat set should sit clear of the door arc.
- Choose washable, moisture-tolerant textiles. Avoid high-pile rugs near the shower or bath where water pools.
Hallway
- Keep the primary route completely clear. Narrow runners are effective here; they define the path without encroaching on it.
- Vertical storage and umbrella stands at the entry handle clutter without narrowing the corridor. For small-space ideas, Homable’s guide on decorating small spaces covers compact storage tactics in detail.
Choosing storage, textiles, and finishes that preserve flow
Wall-mounted and vertical storage beats freestanding bulk in any corridor or compact room. It keeps primary walkways clear while adding capacity. For rugs, size matters more than most buyers expect: a rug that is too small floats in the middle of a zone and makes the room feel disconnected. The front legs of sofas and chairs should sit on the rug; the back legs can float.
In high-moisture zones such as kitchens and bathrooms, favour washable mats with non-slip backings. Low-pile rugs work best where doors swing over them, since a thick pile can catch a door and wear unevenly. Natural-fibre options, such as bamboo rugs, suit transitional spaces and areas adjacent to outdoor access.
Pro Tip: Match rug pile height to your furniture leg type. Thin tapered legs sink into deep pile; flat-base furniture sits better on low or flat-weave rugs. Getting this right means fewer replacements when you redecorate.
Common layout mistakes and how to fix them
Many of these errors appear in homes that look fine on paper but feel wrong to live in. Homable’s guide on common home styling mistakes covers several of them in detail.
- Filling space too quickly. Buying furniture before observing natural pathways almost always results in blocked routes. Walk the room empty first.
- Ignoring circulation widths. Pull furniture back until primary paths are 60–90 cm wide where practical. This single change transforms how a room feels to move through.
- Misjudging rug size. A rug that is too small makes a room feel smaller, not larger. Measure the zone, not the gap.
- Placing sockets behind large items. Map socket positions before finalising furniture placement. Trailing cables across a circulation path are both a hazard and a layout failure.
- When to call a professional. If a route can only be fixed by moving a door or removing a wall, that is a structural change requiring a builder and potentially building regulations approval from your local authority. Cosmetic fixes cannot solve a structural circulation problem.
How long layout changes take and what they cost in the UK
| Change type | Typical timeline | Notes |
|---|---|---|
| Small tweaks (furniture, accessories) | A weekend to one week | DIY; no trades needed |
| Moderate changes (built-in storage, radiator repositioning) | 2–6 weeks | Requires plumber or joiner; get quotes |
| Major reconfiguration (moving doors or walls) | Several weeks to months | Building regulations may apply; check with your local council |
For structural changes in England and Wales, check whether the work requires building regulations approval via the Planning Portal before engaging a builder. Scotland and Northern Ireland have separate processes. A staged verification routine that catches conflicts early keeps costs down regardless of project scale.
How Homable products complete your layout plan
Once the plan is set, the right products make it real. Here is a short shopping checklist to use while browsing Homable:
- Bathroom: measure door swing before buying any mat. Homable’s non-slip bath rug set is water-absorbent and sized to sit clear of most standard door arcs.
- Kitchen: confirm the runner length fits between appliances with clearance at each end. The washable kitchen rug above handles daily spills and wipes clean.
- Living room: check your zone dimensions against rug size before checkout. Homable’s woollen rug range suits both anchoring furniture groups and adding warmth to a defined seating zone.
- Hallway: measure corridor width and choose a runner that leaves at least 30 cm of floor visible on each side.
- All rooms: filter by non-slip backing, pile height, and material on Homable product pages before adding to basket. Run the room checklist above before checkout.
Key takeaways
Designing a functional layout means settling circulation and zones before choosing furniture, then selecting accessories that reinforce the plan rather than fill gaps.
| Point | Details |
|---|---|
| Circulation comes first | Clear 60–90 cm primary paths before placing any furniture or rug. |
| Use a bubble diagram | Sketch zone adjacencies early to prevent bad placements before geometry is fixed. |
| Test before you buy | Tape furniture outlines on the floor and live with them for a day before purchasing. |
| Verify light and services | Check daylight, socket positions, and door swings at stage 5 to avoid costly rework. |
| Homable products complete the plan | Match rugs, mats, and runners to measured zones using Homable’s size and material filters before checkout. |
Why less furniture usually means a better layout
The rooms that genuinely work are rarely the fullest ones. What I see repeatedly is a household that has bought well but placed too much: a sofa that sits two centimetres too far from the wall, a rug that is half the size it should be, a storage unit that blocks the one window that makes the room feel alive. Simplifying the circulation, removing one piece of furniture, and replacing it with a considered accessory transforms the feeling of a space more reliably than adding anything new.
The practical steps above reflect that logic. A bubble diagram is not an architect’s tool — it is a way of asking “does this zone need to be next to that one?” before you commit. The tape-on-the-floor test is not a workaround; it is the fastest way to feel whether a layout is honest. Homable’s curated range works precisely because the products are chosen to complement a plan, not to fill a void.
Further reading and sources
The following sources informed this guide and are worth reading in full if you want to go deeper:
- How to plan a functional house layout — Studio Matrx: staged workflow, bubble diagram method, and verification routine.
- How to create functional layouts for modern living — Manon Design Studio: people-first design philosophy.
- Designing a functional layout when moving into a new home — Impakter: observation-first approach and mock-up testing.
- How to design a room layout — Furniture Traditions: circulation as the plan’s skeleton and zoning principles.
- How to plan a functional floor layout before construction — Space Manager: door swings, sunlight mapping, and service constraints.
- How to optimise room layout for style and functionality — Homable: practical furniture arrangement guide.
- Step-by-step home decorating guide — Homable: decorating workflow that pairs with layout planning.
Homable: decor that fits your plan, not the other way around
The gap between a good layout plan and a finished room is usually a handful of well-chosen products. Homable stocks the pieces that close that gap: washable kitchen runners sized for work triangles, non-slip bath mat sets that clear standard door arcs, wool rugs scaled for living-area zones, and narrow hallway runners that define a path without narrowing it. Every product page lets you filter by size, material, and backing type so you can match what you measured, not guess.
Free shipping applies to orders over £100, which means a rug, a runner, and a bath mat set typically qualify in a single order. Browse the full Homable collection and use the room checklist from this guide before you reach the checkout.